Warning: ini_get_all() has been disabled for security reasons in /home/imagine/public_html/wp-includes/load.php on line 1472

Warning: ini_get_all() has been disabled for security reasons in /home/imagine/public_html/wp-includes/load.php on line 1472
Emma Greenwood, Author at Imagination In Colour - Page 94 of 98

Author Archives: Emma Greenwood

Being Human Inspired Nails + A Nail Art Tip.

Hello all!
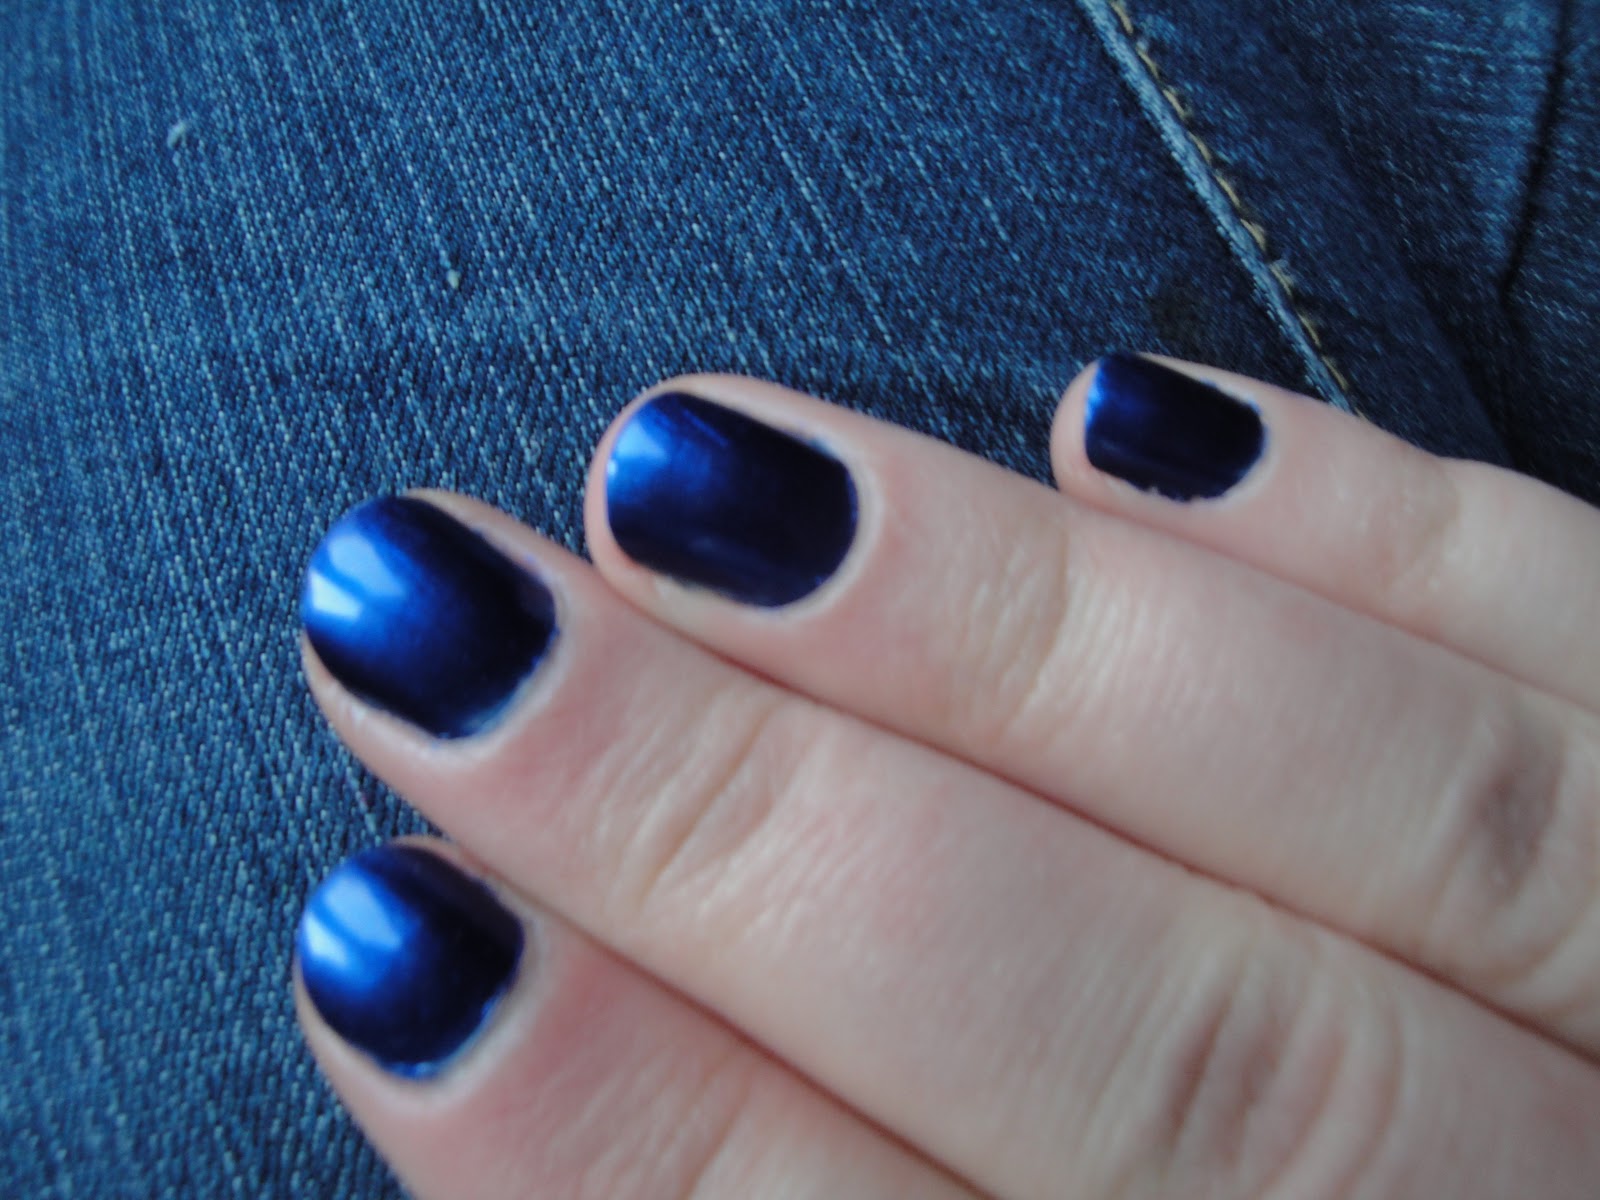
In case you weren’t already aware (how could you not be), it was the Being Human Series 3 finale last night. Words cannot describe my love for Being Human. Anyway. In honour of the occasion I did a little bit of nail art with my new favourite blue, Nails Inc. Chandos Place. This polish was one of the ones I received in the lucky dip and I must say I was very lucky! This is a very close match for Barry M’s Navy, although perhaps a tad lighter. I will do a comparison soon.

Hehe… can you guess the relevance of each nail?
In daylight.
Nails Inc. Chandos Place in daylight, 2 coats.

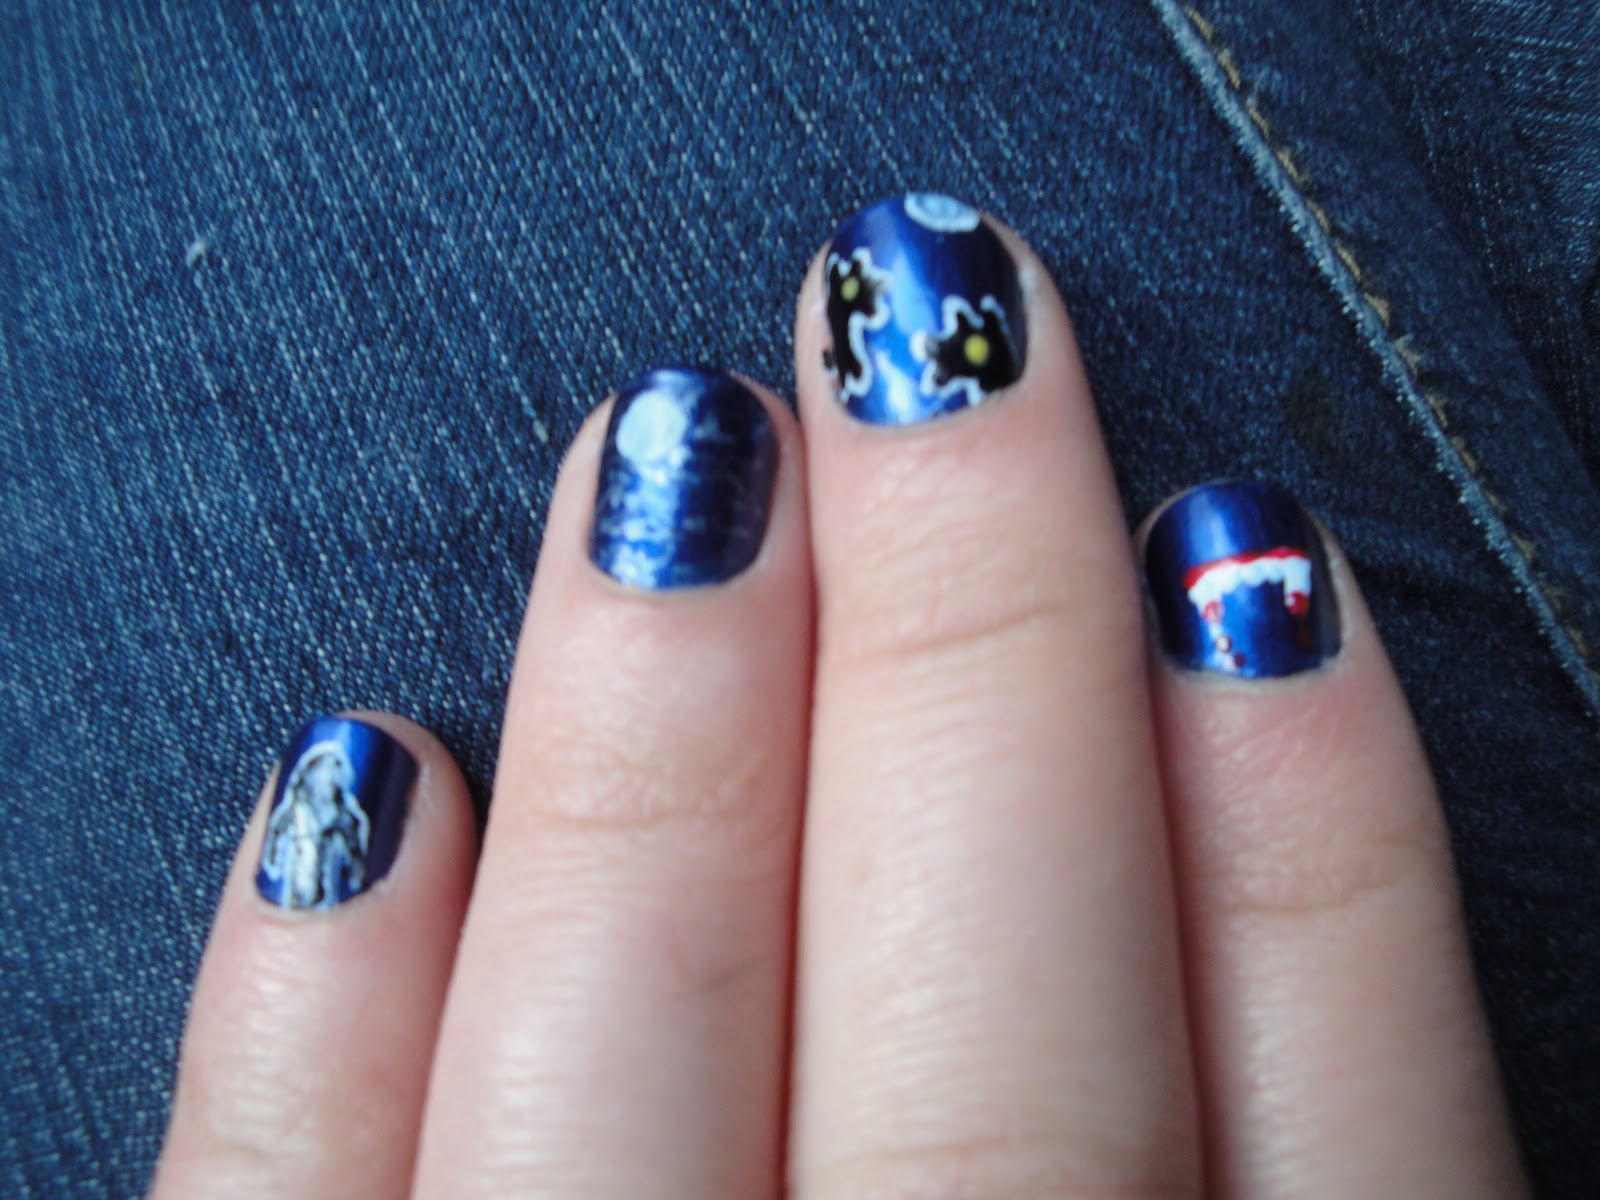
My nail art tip. Now I’m sure that I am by no means the first person to come across this trick but so far I haven’t spotted it on any blogs, otherwise I would be giving credit. So apologies to anyone who may have come across this/invented it, I promise this was just a compromise of my own making! For the full moon you see on my ring finger I was totally stuck as to how to make a perfect circle on the nail, since I suffer from shakey hands. I was umm-ing and ahh-ing until I came up with my initial solution. Cotton buds! However I then remembered that cotton buds are lint-hoarders and I didn’t fancy furry nails. My Barry M 3-in-1 Base Coat, Top Coat and Nail Hardener has been on a hiatus as it became very gloopy with less than a quarter of it left in the bottle. I would suggest using an old base coat/top coat/clear polish as it will become lint-tastic after this trick. Also make sure it’s clear to avoid ruining the colour of your circle. here are your instructions!

1. Dip the cotton bud into the base coat/top coat/clear polish and immerse it in the polish.
2. Remove the cotton bud, trying not to keep too much polish on the cotton bud so as to minimise the dry time.
3. When the polish on the cotton bud becomes tacky, gently mould the end of the bud into a circle.
4. Let the bud dry fully.
5. Once the bud is dry, apply a small amount (a small blob!) of the polish colour you desire for the circle to a piece of paper, and dip the end of the bud into it.
6. Ensuring your base colour is totally dry, apply the coloured cotton bud-end to the nail, and do not squish it around or you will ruin the circle!
7. Likelihood is, you’ll get quite a weak colour with this first application. You have a choice – either fill in the centre using the circle as your margin, or apply repeatedly when the circle is dry to build up the colour.

Sorry for the obvious tip but if it helps just one person then I’m happy.

Nails Inc Chandos Place is a lovely lovely lovely colour. I’m guessing as it was in the lucky dip and is discontinued it’s old stock, which may explain its slightly thick consistency. However this dries beautifully and lasts forever, even without a top coat. I’ve already used up about a 5th of it I love it that much! I’m aware that Chandos Place is/has been recently available on eBay.

The piccies were drawn freehand using Rio Nail Art pens, which I love!

Sorry for the Being Human post but I am well and truly OBSESSED! with it. I mean really, really obsessed.

Anyways, hope you are all well 🙂
Emma xxx

Disclaimer: Everything mentioned in this blog post was either bought by myself with my own money, or given to me as a gift from friends/relatives. All opinions expressed here are my own.

Glamour Magazine Clinique Freebies

I’m sure you all know that Glamour Magazine is giving away 10 different Clinique sample freebies in their magazines, one sample in each. Obviously Clinique is quite a high end brand and so these freebies are like an ultra bargain! I waited a week or so to pick one up as I knew there would be a bit of a rush in the first few days for everyone to get their desired product. Having read around a bit, I learnt that the lipstick was probably the best value for money as it’s close to full size. Hence why I picked up the lipstick. Here are some piccies 🙂 (lots of pics…)

Can you see all that gorgeous golden shimmer?
White teeth illusion…
With flash.
Without flash.
To give you an idea of the size.
The High Impact Lip Colour in Rouge Impact “17 Rosette”. SPF 15 which is always a bonus.
This lipstick is a gorgeous red, packed with golden shimmer. It’s absolutely stunning, and for someone who doesn’t tend to suit red lipstick, I am overly happy with it! The combination makes me think of a sunset.
Application was lovely, this is a very moisturous (not a word but I can’t think of a better one!) lipstick in that it doesn’t dry your lips out as much as a lot of  supposed “moisturizing” lipsticks. *cough natural collection?* It glides onto your lips beautifully. It stays on for quite a while, but definitely doesn’t dry out, as every time I touched my lips my fingers were left loaded with gold shimmer. I talk quite a lot and I found that this also seemed to somehow remove a lot of the pigment. It certainly does not last the 8 hours advertised online! Maybe you’re meant to keep tight-lipped.
Considering the usual price tag for this lipstick is £15, I would expect a little more of the formulation, for example to last a bit longer or dry just enough to prevent losing it all at every sip of a glass! But there we go. The one I have is called “17 Rosette” but the online swatch looks totally different to the colour I have, so that may be something to watch out for if you ever buy this online.
Definitely worth the bargain £2, plus the Glamour magazine which is packed with clothes, makeup and celebrities etc.. I’m considering picking up a few more as I’d never spend £15 on this lipstick! Glamour can be found in most supermarkets, newsagents and ‘drugstores’.
Hope you’re all having a lovely weekend.
Emma xxx
Disclaimer: Everything mentioned in this blog post was either bought by myself with my own money, or given to me as a gift from friends/relatives. All opinions expressed here are my own.

Boots 17 Lasting Finish Toasted Almond x Accessorize Magical Mocha

Left to Right: Accessorize Magical Mocha, 17 Toasted Teacake, Magical Mocha, Toasted Teacake. Both with two coats.
I often get to the point in an evening where I am so tired that all I want to do is crawl into bed and sleep. Usually very late at night, actually. And hence I am forever grateful for the lovely polishes that dry quickly enough to give you a beautiful finish and let you have max possible sleep!
Both these polishes dry very quickly. Magical Mocha is a wonderful brown shimmery-foily polish, with a hint of mauvey-purple. I love it! It’s one of those colours that looks subtle let sophisticated. Toasted Teacake is a beautiful browney-gold pearly polish, which is simply gorgeous. This too is subtle yet ever so glam 🙂 The formula of both of these polishes is fab, I would 100% recommend both of them.
I love the look of both of them on their own, but for a little interest I decided to go for a mixture of both, and it really turned out well! The best part is is that they are both subtle enough to go with most outfits.
The Boots 17 Lasting Finish retails at £2.99 usually, while the Accessorize polish can only be found in Superdrug (and possibly Accessorize itself – not sure on that one) at £4 a bottle.
I’m in love! I’ve dragged both out a couple of times when I’ve just been too tired to do anything that takes any large amount of drytime.
Really pleased that I had no sheetmarks whatsoever, despite applying the second coat about 15 mins before I was deep in the sleep! 🙂
On a sincere note I am devastated by the Japan disaster, I can’t stop thinking about it. I wish I had money to donate but I just don’t have anything 🙁 so so sad, my heart goes out to everyone affected by the incidents.

Emma xxx
Disclaimer: Everything mentioned in this blog post was either bought by myself with my own money, or given to me as a gift from friends/relatives. All opinions expressed here are my own.

Barry M Spring Green Nail Paint

Barry M Spring Green, 2 coats.
Shown against Mint Green, read on and you’ll find out why! 🙂
Again, comparison.
I bought this colour late December 2010, but it is still everywhere. I’d been coveting a rich green like this for a while, and just couldn’t find one anywhere. However when I saw All Lacquered Up’s review of Barry M Spring Green I knew it was the one for me!
After searching for it on Google though I noticed that many of the photos appeared to look identical to Barry M’s Mint Green, and even on the Barry M website it looks identical to Mint Green, hence the bottle comparison above. I have had a few problems with Barry M’s labelling and online colour swatches being totally different to what they should be, but I’ll forgive them just this once.
Onto the colour. I think the reason why so many pictures looked similar to Mint Green was because this polish is truly truly impossible to capture on camera. Unless it’s just my camera. But seriously. This is a gorgeous bright green, in just the right tone. It kind of reminds me of Lego green, maybe a little lighter. (Hey… does anyone remember Duplo? I was the only one who played with it when I was young 🙁 ) I love love love this colour, it’s just what I was looking for – not neon but nearly as bright. It’s very vivid. I love it!
Consistency was quite watery, and this one dried quite quickly… the reason you can see all those sheet marks is because I got way too sleepy and just went to bed before it fully dried.
This colour is lovely and eye-catching, I would recommend it to anyone! Works well with pale skin, but I think this would look gorgeous with a darker skin tone.
Hope you’re all having a lovely week, I got my results back today, mixed feelings about them.
Emma xxx
Disclaimer: Everything mentioned in this blog post was either bought by myself with my own money, or given to me as a gift from friends/relatives. All opinions expressed here are my own.

Florence & Fred Bows

A little while back Andy bought me these from Tesco, and I love them! There is no indication as to whether they are for hair or for clothes but to my way of seeing it they can be used for both. I’ve worn them in my hair anyway 🙂

They’re a lovely way to liven up a dull outfit or just loose hair, or even a casual hairstyle, and at £4 for 3 it’s such good value!

They are still in Tesco, found on the Accessories stand in the clothes section 🙂

In other very exciting news I logged on today only to discover that I’d won the lovely FleurdeForce‘s day 1 giveaway, 13 items from Lee Stafford! I am so so grateful 🙂 really looking forward to receiving them, will get a few posts lined up to review the products!

Hope you’re all having a lovely week, mine’s feeling a bit stressful as I still haven’t finished my Chemistry coursework, I’m behind with Maths homework, my results come out on Thursday and I haven’t had time to do the illustrations I had planned for two short stories of my creation due to be published in an Anthology… the one thing on that list I’d actually enjoy doing! Anyways, off to slave at said list…
Emma xxx

Disclaimer: Everything mentioned in this blog post was either bought by myself with my own money, or given to me as a gift from friends/relatives. All opinions expressed here are my own.